Of course there are always those few users who are excited about the changes, but most of us, that includes me as well, simply hated the change. With Windows 10, Microsoft has tried to create a bridge for users who liked the classic Start Menu and those who love the Start Screen. But still, if you really want to go back to what was familiar, here is a complete guide on how you can achieve the classic styled Start Menu on Windows 10.
Simply Removing the Tiles
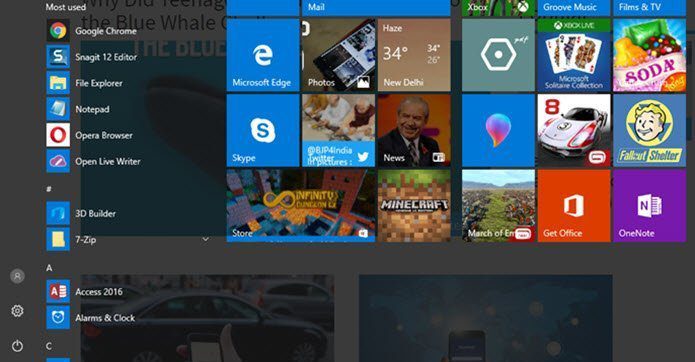
If you are fine with the new and improved Start Menu in Windows 10 but still need to get the live tiles out of your way, you can simply remove them. Most of us, that includes me, still can’t make peace with the concept of tiles introduced in Windows 8. All I need is a simple Windows Start Menu, where few of my frequently used items are pinned directly and the rest can be searched easily. Now the good thing is, if you remove all the tiles that comes default with Windows 10 you will be left with an empty space. All you need to do is, resize the Start menu and shrink to show only the pinned apps on the start menu. However, there’s no easy way to remove all these app times. You will have to right-click on each of them manually and remove them one by one. For most users, this will be enough. But if you are a rather hardcore Windows 7 fan, you can try the Classic Shell I will be discussing next.
Classic Shell for Windows 10
Classic Shell is a free and easy to use program using which you can get back the classic Start Menu without any manual work. The latest stable build still mentions that it’s supported for Windows 7 to 8.1. But beta builds and even the RC build is out, therefore you can try those to get more stability on Windows 10. The beta builds are located on the top-right section of their homepage. While installing the Classic Shell, you can choose to ignore the Classic Explorer and Internet Explorer. The installation is simple and you can follow the on-screen instruction to complete the setup. Thereafter, search for the Classic Start Menu and open it up. You will be given three options that are, Classic, Classic with two columns or the Windows 7 style. All you need to do now is, select the style you wish to use and click on the OK button. You can choose to back up the styles as an XML file before you apply the Classic Start Menu for the first time. Once the settings are applied, you can click on the Start Menu button and you will see the classic menu which you opted for. One good thing about Classic Shell is that it doesn’t disable the default Windows 10 Start Screen, but only hides it by the classic menu. At the top of the classic menu, you get the option Start Menu (Windows) clicking on which you can get back the Windows 10 Start Menu for that particular instance. This can be useful if wish to look for some information on the default menu. Note: Windows 10 Start Menu will only be displayed once when you click on the option. It will revert back to the classic menu once it closes.
Customizing the Start Menu
If you wish to change a few of the default settings of the Classic Start Menu, it can be done from the Classic Shell settings. Right click on the Start button and choose the option Settings. It will open up the same screen where we selected the classic menu style. On the same screen, you can change the icon of the Start Button. If you want the Start Orb, download the image from the internet and apply as a custom image. You might have to crop and scale it to fit the panel. Under the Basic Tab, you get the options like. I prefer small icons and text in my classic start menu and you can try those settings. Apart from that there are few actions and shortcuts you can configure. Finally moving on to the Customize Start Menu tab, you can choose what you see in your menu. Here you can choose to include or exclude folders from your favorites and separate them using a separator wherever you like. Advanced users can try the Show all settings mode, but that’s too deep and beyond the scope of the article. You can tweak almost anything there, but make sure you know what you are doing.
Conclusion
Classic Start Menu is as easy as it can get for users who cannot adjust to changes. It’s easy to install and configure. If you change your mood and wish to make the Windows 10 Start menu as the default, simply uninstall the app. That was easy… right? Before you go, why don’t you tell us what do you think about Windows 10, is it comfortable to work on? The above article may contain affiliate links which help support Guiding Tech. However, it does not affect our editorial integrity. The content remains unbiased and authentic.